Dexter: Pulse dryers
This note covers reader installations on older Dexter coin-op dryers such as DDAD, DL2X, DDAB, DLC.
The reader uses pulse control to send a single pulse to the dryer control, using the coin-drop interface (connector P2).
The reader uses pulse control to send a single pulse to the dryer control, using the coin-drop interface (connector P2).
Only one reader per stack is required.
Parts
-
Card Reader Assembly with mounting back-plate (Generic RELAY card reader board installed - Part #: ASSY-02-02-11):
- Reader Wiring harness (Part #: 02-06-54):
- 12V External Power supply:
Installation
Before proceeding, you should assign numbers to each of the machines.
It is highly recommended that you place number labels on each dryer machine.
Step 1: Turn Machine Power Off
Step 2: Remove Coin-Box and Coin Drop (Card Only Installs)
Removing the Coin-box and Coin Drop is only necessary during Card Only installs.
If you are installing the reader in a Hybrid Coin+Card configuration, the coin-box/Coin Drop will still be needed.
Step 3: Number the reader using the DIP switch
Review our: Reader DIP Switch settings article for details on how to set the Card Reader's Machine Type, and Reader Number.
You need to do this BEFORE installing the Card Readers onto the machines, as accessing the back of the card reader is required.
Step 4: Start Signal Connector
The Card Reader's signal wires need to be connected to the machine's Coin Input.
On most models, this will be the P2 Header on the machine's control board (however some models may use the P3 Header):
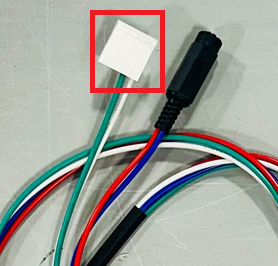
For Card Only installs:
On most models, the Coin Drop's connector will be removed from the machine's P2 Header, and the card reader's signal connector will be connected in it's place:
On some models, like the DRC55QSS models, the Coin Drop may be connected to machine's P3 Header.
In these cases, you'll need to cut red wires coming from the Coin Drop and splice the card reader's signal wires (Green and White) to those red wires individually:
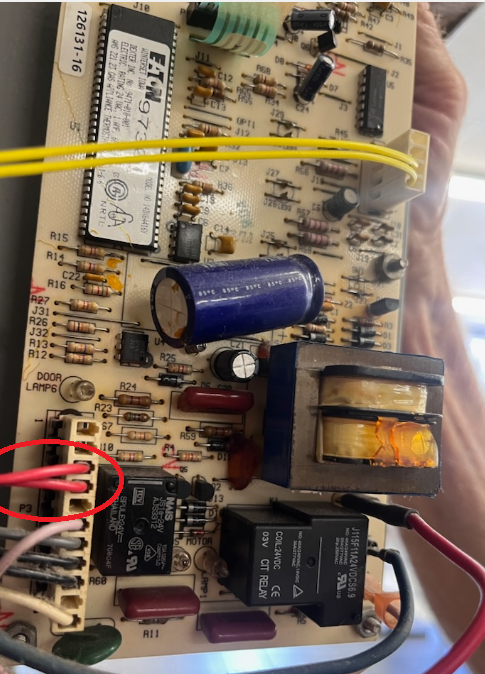
In these cases, you'll need to cut red wires coming from the Coin Drop and splice the card reader's signal wires (Green and White) to those red wires individually:
For Hybrid Coin+Card Installs:
The Hybrid install reader kits will come with an additional splitter harness (part #: 02-06-111) for the Coin Input connection:
This cable is used in order to connect both the machine's Coin Drop, and the Card Reader's signal connector, to the same P2 Header on the machine's control board.
This allows the Coin Drop to use Coin 1 Input, while the Card reader uses the Coin 2 Input:
Alternatively, if you do not have the above splitter cable, you are able to remove the PINs from the Card Reader's signal connector, and install these PINs into the Coin Drop's original wiring harness connector, so the Card Reader's signal wires are using the Coin 2 input (however all current hybrid reader kits for these machines will come with the above splitter cable):
Step 6: Power
The Card Reader harness will have a mating connector for the provided external power supply:
Connect the 120/240Vac side of the power supply, either to an available wall outlet, or splice the power supply directly to the machine, using an appropriate high-voltage connection inside the machine. Most installations will connect power to the machine directly.
When connecting to the machine directly, you'll be cutting off the AC prong and splicing these wires directly to the machine's 120/240Vac power source (we recommend consulting the manufacturer, or an electrician, to confirm this type of connection).
Step 7: Mount the Reader
Proceed to secure the reader to the machine using the provided hardware.
For Card Only Installations
- For DL2X models, the reader typically goes over Coin-Drop area.
- For all other models, the reader typically gets installed where the Coin-Box was removed (you may need to lower the reader plate to avoid overlapping the divider on the front of the dryer - do this by tucking the lower lip of the reader bracket between the reader plate and the machine)
- There are some models (EasyCard Ready machines) where the card reader will mount where the EasyCard reader is removed
For Hybrid Coin+Card Installations
You will need to find a spot on the machine to mount the reader that will allow you to pass the reader's wiring harness through to the inside of the machine (drilling custom holes will be required for this type of install).
Step 8: Activate the Card Reader
Use the provided Activation Card to activate the reader:
You must use the Activation Card for this specific location (if a reader is activated with a different location's Activation Card, it will be unable to communicate with the VAC kiosk)
Pricing
Set the Card Reader's vend price via the Laundro Portal. (this will NOT adjust the price displayed on the machine's display).
The price you set the card reader to, will determine how much customers pay to start the machines, but you'll need to adjust both the Dry Time, and the machine's displayed price, on the machine directly.
See our Configuring Card Reader/Machine Vend Prices article for specific instructions on vend pricing.
To make sure the machine starts from 1 tap of a laundry card, you need to adjust the machine's Coin Value setting so that it matches the machine's Vend Price setting.
The card reader only send 1 pulse (1 "coin") to pay for the machine, so the machine needs to know that the pulse it gets from the reader is equal to the full vend price of the machine.
By default, the machine's coin value setting is usually set to $0.25; so if tapping a laundry card only takes $0.25 off the vend price being displayed on the machine; you need to adjust the machine's coin value setting so that 1 tap from the reader satisfies the full vend price of the machine.
The card reader only send 1 pulse (1 "coin") to pay for the machine, so the machine needs to know that the pulse it gets from the reader is equal to the full vend price of the machine.
By default, the machine's coin value setting is usually set to $0.25; so if tapping a laundry card only takes $0.25 off the vend price being displayed on the machine; you need to adjust the machine's coin value setting so that 1 tap from the reader satisfies the full vend price of the machine.
If you've installed readers in a Hybrid Coin+Card configuration, and the card reader and coin drop are sharing the same coin input, it will not be possible to adjust the Coin Value setting without affecting Coin Drop operation.
Contact our support team for help setting up Dryer readers with this Control Type setup.
Troubleshooting
Below are problems commonly encountered during installation of readers on these dryers. For more general reader troubleshooting, see Troubleshooting Readers
| Issue | Explanation and resolution |
| Reader taking money BUT time not actually added or Reader takes full payment, but only $0.25 is removed from the machine's displayed vend price | This usually means that the vend price or value of the pulse are not configured on the dryer in a way that will allow it to add time, or start the machine, with only a single card reader pulse.  NOTE 1: The cable harness connects to Coin2 (or 2nd Coin switch) input on P2 Header, not the primary Coin input where the coin-drop normally connects. So ensure that on the dryer, you're configuring the pulse parameters for Coin2 (may also be called Right Coin Value) NOTE 2: if this is a conversion from an EasyCard system, the default setting is usually treating one pulse as $0.25cents. So if the Vend price is anything other than $0.25, one pulse from the reader will NOT start the machine (you should see the machine's displayed Vend price go down by only $0.25. You'll need to configure the Dryer's Coin Value setting to equal the full Vend price of the machine (or change the machine's Vend price to $0.25) |