Electrolux: Compass Pro dryers
Electrolux Compass Pro Dryer
Parts
- Card Reader Kit (CR-11-xxx-04 or CR-11-xxx-29)
with a Generic Relay (Part #: ASSY-02-02-11) card reader board installed: - Reader Wiring Harness (part #: 02-06-51 or 02-06-51B)
(photo above is of the newest version of the harness (02-06-51B) with plug-and-play board edge connectors) - Mounting hardware (varies based on machine/installation type)
For Card ONLY Installs,Stack Dryers, reader kits will have mounting back-plates that differ between their left and right versions:Single Pocket Dryers, the reader kit will include the following mounting bracket:For Hybrid (Coin+Card) Installs,The mounting bracket for the Dryers will look like this (and allow for card readers to be installed/remove separate from the bracket itself):
Installation
- Before proceeding, you should assign numbers to each of the machines in the laundry room/building. It is highly recommended that you place number labels on each washer and dryer machine.
- Set the Machine Type and Reader Number using the DIP switch on the reader circuit board:
Review our: Reader DIP Switch settings article for details on how to set the Card Reader's Machine Type, and Reader Number.
You need to do this BEFORE installing the Card Readers onto the machines, as accessing the back of the card reader is required. - Turn machine power OFF!
- Remove the Coin Drop if present (for Card Only Installs)
- Connecting the Reader's Wiring Harness
Latest generation harness
If you have the latest generation harness, 02-06-51B,
simply plug the connectors to the edge of the green coin board inside the dryer, removing any existing screw terminal connectors that might be present:
Ensure that the RED/BLUE wire connector plugs into the DC Out terminal.
- For Card ONLY installs - The single WIHTE wire coin connector should connect to Coin1 terminal
- For Hybrid Coin+Card installs - The WHITE wire coin connector should connect to the available Coin Input (usually Coin2 terminal as Coin1 is likely in use by the machine's Coin Drop)
Older generation harness
The older generation harness, 02-06-51, has three bare wires labeled as GND(COM), 9V, and Coin.
There are two variants of coin board: with screw terminals and without screw terminals.
In either variant, the connections between the harness and the coin board should be as follows:
RED wire <---> 9V
BLUE wire <---> GND (ground)
WHITE wire <----> Coin1 (or Coin2 for Hybrid installs)
Variant 1: Boards with screw terminals (Older generation harness)
Use the connectors with screw terminal to make the connections as per below. In some cases the dryer may not have the connector shown on the left, and instead have the 2-pin connector that fits all the way on the right side of the board. This 2-pin connector has the same 9V and GND, so you can use as another option for power.
Variant 2: Boards without screw terminals (Older generation harness)
You will have to splice the three wires to the existing cable harness as shown:
The result should look like this:

Note: For Hybrid (Coin + Card) Installs
For hybrid installs the coin drop will likely be using the Coin1 input;
so you'll want to connect our card reader to the Coin2 input instead
For hybrid installs the coin drop will likely be using the Coin1 input;
so you'll want to connect our card reader to the Coin2 input instead
6. Mount the reader
For Card Only installs, the reader mounts in the same location where the Coin-Drop would normally attached.
For Hybrid Coin+Card installs, custom holes will need to be drilled into the machine, and the reader should be mounted in an area where the reader wiring harness can be pass through to the inside of the machine

For Card Only installs on Stack Dryers, the Left side and Right side mounting plates are different.
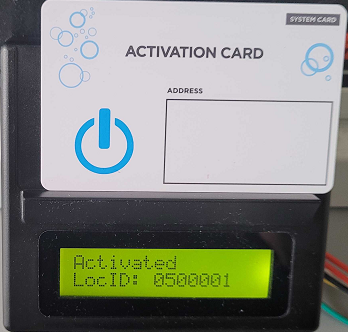
7. Activate the card reader using this location's Activation Card:
Vend Pricing
Set pricing of the card reader via the Laundro Portal. Set the Cycle time duration on the machine itself.
See our Configuring Card Reader/Machine Vend Prices article for general instructions on vend pricing on Pulse Communication card readers.
The price that the Card Reader is set to, is the price that customers will be charged when tapping a Laundry Card.
However, changing the price of the Card Reader will NOT change the price displayed on the dryer itself.
On these machines, you need to set the price on both the Card Reader, and Machine, separately.
The actual dry time that the dryer will add, is completely control by the Dryer (NOT the Card Reader/Laundro Portal).
Whatever time you set on the dryers, you'll want to ensure that the simulated dry time setting on the Card Reader is configured to match.
There are 2 different Card Reader Control Types that can be used on these machines.
Below is a screenshot showing the card reader's settings,
when the reader is using the default Control Type "Coin Dryer, Normally Closed (NC) [04)":
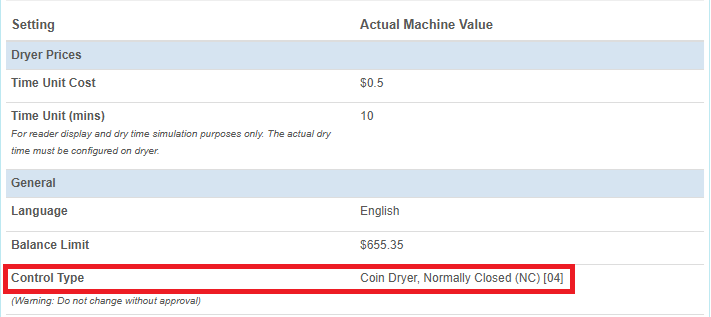
With the "Coin Dryer, Normally Closed (NC) [04)" Control Type,
you'll want to match the following machine/reader settings:
- The Machine's "Time per Coin" setting = The Card Reader's "Time Unit (mins)" setting
- The Machine's Vend Price (Machine's "Price on All Programs") setting = the Machine's "Coin Value" setting = The Card Reader's "Time Unit Cost" setting
The Time Unit Cost setting dictates how much the reader will charge to a Laundry Card to start the machine.
The Time Unit (mins) setting is the simulated time that the reader uses to knows when it should display that the machine is in use, as well as what amount of dry time to display to customers, on the reader's display itself.
On the machine side of things, the machine's vend price needs to match the machine's Coin Value setting so 1 tap of a Laundry Card satisfies the full vend price.
Below is a screenshot showing the card reader's settings,
when the reader is using the newer Control Type "Universal Pulse Dryer [29]":
The main difference with this newer Control type and the default one, is that you're able to set a Full Cycle Vend price that is different from the Top Off Vend price, if you wanted to.
If you simple want to charge the same vend price for both starting the machine, and adding additional dry time to an already running machine; then you would use the exact same settings for the Full Cycle Cost/Time settings, and Top Off Cost/Time settings.
If you simple want to charge the same vend price for both starting the machine, and adding additional dry time to an already running machine; then you would use the exact same settings for the Full Cycle Cost/Time settings, and Top Off Cost/Time settings.
With the Universal Pulse Dryer [29] Control Type,
you'll want to match the following machine/reader settings:
- The Machine's "Time per Coin" setting = The Card Reader's "Top Off Time" setting
- The Machine's "Coin Value" setting = The Card Reader's "Top Off Cost" setting
- The Machine's "Price on All Programs" setting = The Card Reader's "Full Cycle Cost" setting
The Maximum Dry Time setting should be left at "0" in most cases.
If set to any other number (say "30" for example), the reader will no longer take payment once 30 mins has been paid for.
The Pulse Type setting NEEDS to be set to "1" for the reader to work on these machines.
The Number of pulses for Full Cycle setting should be left at "0" in most cases.
If the Full Cycle Cost/Time, and Top Off Cost/Time are not multiples of each other, it may be necessary to set this setting to something other than "0".
Contact our support team if you need help determining how to configure this reader setting.
The Ground PIN1 (for Netmaster, Maytag dryers) setting NEEDS to be set to "0" for the reader to work on these machines.
Troubleshooting
Below are problems commonly encountered during installation of readers on these machines specifically. For more general reader troubleshooting, see Reader Support Process
| Issue | Explanation and resolution |
| Dryer can be started for Free - without a card being placed on the reader | The dryer control is in Free Mode. Adjust the settings inside the dryer control |
| Reader takes money from the card, says "Time Added" but no actual time is added to the machine. | After the reader takes money, check the vend price on the machines control board. IF the vend price shown on the machine changes (goes down by some amount, usually $0.25): - The dryer is looking for more than one pulse to start. Check settings inside the dryer to ensure it will add time from a single pulse. This is done by setting the Coin1 and Coin2 values to the same amount as (or higher than) the vend price of the machine If this is a Hybrid Coin + Card payment setup, then only change the Coin value for the input that the card reader is connected to (Typically Coin2) IF the vend price shown on the machine does NOT change at all, it could be 1 of 2 issues: 1. Bad connection in pulse/start wires. Ensure that START wire (typically white) is connected according to the above instructions. It must connect to the Coin1 (card-only installs) or Coin2 input (Hybrid installs) 2. Coin1 and Coin2 value is 0 or not configured. Go into service menu ensure these are both set (to 25cents typically) 3. The machine's PRICE ON ALL PROGRAMS setting is most likely set to $0 If this setting is set to $0, the machine may not look for pulses from the reader. Set this setting to the same VEND PRICE value that you set on the machine 3. Dryer needs a reboot. Reset the breaker to reboot the entire dryer |
Related Articles
Electrolux: Compass and Clarus Control Washers
This installation article covers Wascomat/Electrolux washers with Compass and Compass Pro controls (the ones with the knob) and the Clarus vibe controls. The reader uses Serial communication to communicate with the machine directly, including the ...Wascomat/Electrolux Selecta II dryers
This article covers installation of readers on Wascomat or Electrolux dryers with Selecta II controls. The readers for these machines use PULSE control (Coin Drop emulation). Required parts Card Reader Kit (model CR-11-130-04 for stacks, CR-11-230-04 ...Fagor Dryers
This note covers reader installation on Fagor and Domus Dryers . The reader uses pulse control. Parts Reader (with Generic Relay board - ASSY-02-02-11) Cable harness Installation Before proceeding, you should assign numbers to each of the machines in ...Maytag Gen1 Pulse Dryers
This article is applicable to Maytag dryers that use older Gen1 Pulse controls (which are still used in some newer models). Typically these dryers have model numbers MLG3xPD and MLG4xPD. Required parts Reader Cable Harness 12V Power supply Maytag ...Wascomat: Encore Dryers
This installation covers Wascomat Encore Dryers. The reader uses Pulse control. The cable harness and connection is identical to Encore washers. Parts Reader Cable harness Installation Do not mix up readers for washers and readers for dryers. They ...