Installing Verifone P630 PINpad (Credit Card terminals)
This article is for customers who've received a Verifone P630 PINpad terminal (for new or existing store locations) and need to install it into the Value Add Center kiosk.
Required Parts
- Verifone P630 PINpad Kit
Will include the Verifone P630 PINpad, a PINpad Terminal wiring harness, an Ethernet Adapter-Box, and the PINpad Terminal's Power supply:
- Verifone P630 PINpad Holder/Bracket
A mounting bracket used to secure the PINpad to the front of the VAC:
P630 PINpad terminal Installation
For those who just need a quick refresher,
below is a picture showing what the final setup will look like (from the inside of the VAC) once the PINpad terminal has been connected to the VAC kiosk correctly.
Essentially the PINpad terminal only connects to the VAC's main control board's AUX1 Ethernet Port, via the short blue Ethernet cable that's already plugged into it;
then the PINpad's power cable will be plugged into the same power bar that's providing the entire VAC with power:
Step 1 - Remove the existing PINpad Terminal (if this is a replacement terminal)
If you presently have a PINPad terminal installed on the VAC, you'll need to remove it first.
To do so, you can work backwards from this installation article;
or if you're replacing a different model terminal, below are links to the installation instructions for other models:
Step 2 - Connect the PINpad Terminal's Wiring Harness
Connect the black end of the Terminal-Cable to the back of the P630 PINpad:

Note: you may need to remove the cover from the back of the terminal first;
this will be held on by 1 Phillips screw, shown below:
Step 3 - Secure the terminal to the mounting bracket
Once the cable is plugged into the back of the terminal, install the cover on the back of the terminal to secure the cable:
Then pass the loose end of the PINpad terminal harness (the Orange end), through the rectangular hole in the mounting bracket;
Place the Verifone P630 PINpad on top of the mounting bracket, and secure it to the bracket with the 2 screws that screw into the back of the terminal:
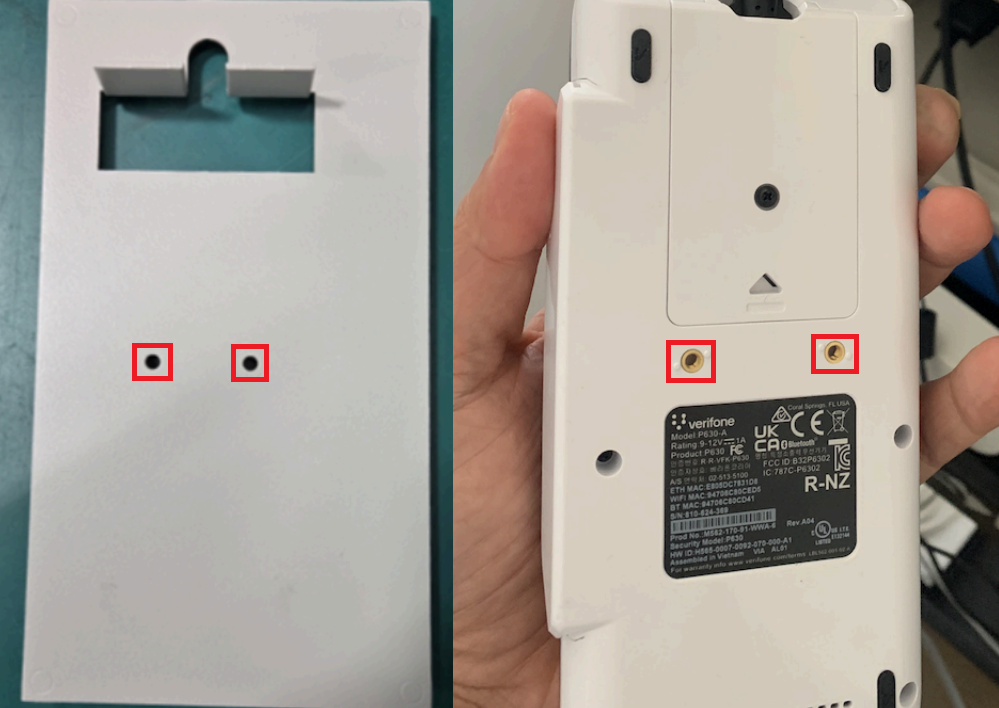
Once the terminal is secured to the bracket;
Pass the PINpad terminal's harness through the square hole, to get the harness to the inside of the kiosk,
then place the entire bracket assembly on to the VAC:
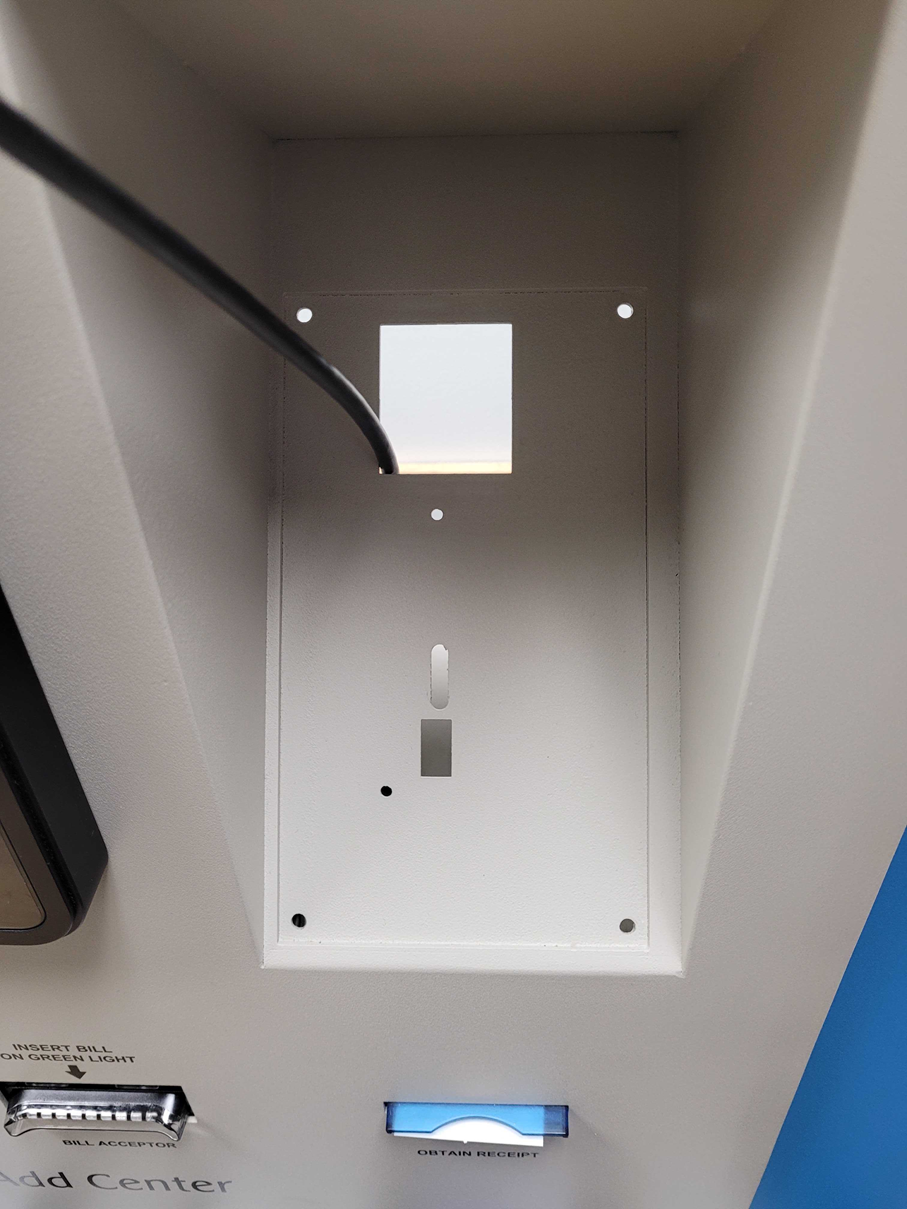
Use the 4 nuts to secure the mounting bracket to the VAC, from the inside of the VAC:
Step 4 - Connect the PINpad Terminal's Power and Ethernet Cable to the VAC
From the inside of the VAC, you will connect the Orange end of the PINpad terminal's wiring harness, and the PINpad terminal's power supply, to the Ethernet hub adaptor:
Then, plug the short blue ethernet cable, that's already plugged into the AUX1 Port on the VAC control board, into the Ethernet Hub adaptor's ethernet port labelled "1":
Then plug the power cabled into any available outlet on the VAC's power bar;
this will trigger the terminal to power ON automatically.
Step 5 - Initial Configuration, and Connecting to a Network
After powering on, the Verifone P630 PINpad will boot up into it's configuration screens.
In some cases the terminal may do some automatic updates first;
but in most cases you will land on a screen asking you to select a Language, a Country, and then you'll be asked to connect the terminal to a Network.
For the Network connection;
you will see a list of all available WiFi networks in your area, however you should also see a blue button at the bottom of the screen that says "Continue with Ethernet"
Click the "Continue with Ethernet" option to continue:
Note: If you're not seeing the "Continue with Ethernet";
power the VAC OFF for 2 seconds (just turn the VAC's power bar OFF and back ON, and this will trigger both the VAC and terminal to reboot).
Once the terminal and VAC have reboot, you should now be seeing the "Continue with Ethernet" option on the Choose network screen.
If the "Continue with Ethernet" option is still not showing up, or if it is available but you're unable to get the terminal to connect to the internet via the Continue with Ethernet option, it's possible the terminal needs to download an update first.
In these cases, connect the terminal to any available WiFi network to continue (it's recommended to use the store's WiFi, or any WiFi network that you control).
Once the PINpad has established an internet connection, it will enter an Update mode automatically;
these initial updates usually take approximately 10 minutes to complete.
Step 6 - Registering the PINpad Terminal to your VAC Kiosk
If this is a new system, in most cases your terminal(s) will already be pre-registered to your VAC kiosks.
If your terminal(s) are already registered, you will see the "Powered by Cents" home screen once all updates have completed:
Once you're seeing the above screen, your P630 terminal is installed, configured, and ready to start processing credit/debit card transactions.
Note: if you're seeing the above screen, but transactions still aren't working;
ensure you've completed the Stripe Merchant Account Application via the Laundro Portal's Payment Processing section
If your terminal(s) are not yet registered to the VAC kiosks,
you will instead see the "Register this reader" screen, which will be displaying 3 random words:
If you're seeing the above screen,
get in touch with our support team, as we'll need to register your new P630 terminal(s) from our end, before the terminal(s) will be able to start processing any credit/debit card payments.
Laundroworks Support Email: support@laundroworks.com
Laundroworks Support Phone Line: 1-888-629-8620 (Mon to Fri; 9am to 5pm EST)
Related Articles
Installing Stripe S700 PINpad (Credit Card terminals) - US Customers
This article is for customers who've received a Stripe S700 PINpad terminal (for new or existing store locations) and need to install it into the Value Add Center kiosk. Required Parts - Stripe S700 PINpad terminal will include an Ethernet Hub, a ...Installing PAX A35 PINpad (Credit card terminal) - US Customers
This article is for customers who receive a PAX A35 PINpad terminal (for new or existing locations) and need to install/replace the PINpad terminal for the Value Add Center kiosk PAX A35 PINpad shown below: If you received a Stripe S700 PINpad ...Configuring the Verifone P400 (Canada)
Overview For new or replacement PINpads terminals, you will need to configure the IP address parameters through the pinpad's configuration menu directly. These parameters will be the exact same for all PINpads, regardless of which VAC kiosk they're ...Credit Card Processing Issues (US Customers)
This is a credit card processing troubleshooting article for US customers using the PAX S300 payment terminal Please ensure that you've checked the web Portal for any specific messages and error codes and that you've noted any specific messages on ...Activating the PINpad payment terminal (US customers)
This article is for customers who have already finalized their merchant account setup, with the payment processor, and need to activate the PINpad terminal attached to the Value Add Center kiosk. If you have already been processing with the payment ...