Replacing Internal USB cable inside Monitor
The article contains instructions for replacing the internal USB cable inside the Touch Monitor.
Steps
1. Power down the Value Add Center kiosk
2. Disconnect cables from the back of the Touch Monitor (Power jack, HDMI, and USB)
3. Remove monitor from the VAC (you will want to have someone assist at the front of the VAC so that the monitor doesn't fall out)
Two of the screws holding the monitor are behind the VAC control board. So you will need to unscrew the VAC control board first. However note that you do NOT need to disconnect all the wiring connections to the VAC board.
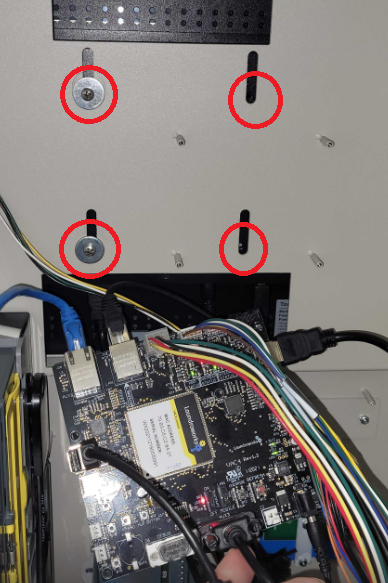
4. Open the back cover by removing the screws circled in red
You may find it easier to separate the back cover by unplugging this white cable harness from the board inside
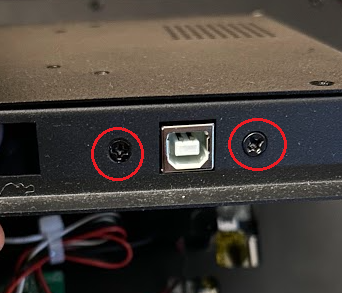
5. Unscrew the panel-mounted USB plug on the cover plate
6. Disconnect the other side of the USB cable from the small board accessible through a cut-out. It will help to use a small flat-head screw driver or small pliers (there might be black tape cover this connection, so just peel it back). Then remove cable entirely.
7. Install new cable by feeding it through the cut-outs as with the original
Related Articles
Touch Monitor Issues
This article discusses what to check for if you're experiencing any issues related to the Touch Screen Monitor on a VAC kiosk equipped with a touch screen: Use the Table of Contents to jump to the troubleshooting steps for your specific monitor ...Replacing Monitor Display Board
The article contains instructions for replacing main display board in the touch screen monitor. Steps 1. Power down the Value Add Center kiosk 2. Disconnect cables from the Touch Monitor (Power jack, HDMI, and USB) 3. Remove monitor from the VAC (you ...Replacing Touch screen Monitor
Follow the steps below. Especially for rear-access VACs, you need TWO people for this operation - one behind the VAC and one in front, holding the monitor, so that it doesn't fall out once the fasteners are removed. Step 1: Power off the VAC ...VAC Control Board Connectivity and Replacement
This article is useful if you are replacing any components inside the Value Add Center (VAC) kiosk. If you're replacing a VAC control board, you may need the Activation card to activate the board (the VAC will display Not Activated in this case) VAC4 ...Replacing Asahi-Seiko Card Dispenser
This article covers instructions for replacing the Asahi-Seiko card dispenser with a SyncoTek Card dispenser Parts Needed ASSY-CD-SK-AD1 (Assembled SyncoTek card dispenser) 01-06-65 (Mounting base plate for SyncoTek dispenser) USB_CABLE_TYPEB (Only ...