Dexter A-series washers
This article covers installation of readers on Dexter A-series washers (WCAD or WVCD models). The readers use pulse control.
This guide is for the current production reader kits for Dexter A-series.
These readers use the Generic Relay (ASSY-02-02-11) board and a high-voltage sensor.
If you're replacing a reader for an existing A-series washer, check to ensure that the reader board inside the reader says "Generic Relay" on it, and that you have a High Voltage sensor installed.
Do NOT use this guide if your reader board says "Dexter A" on it - which is the older production reader for A-series machines.
Required parts
- Card Reader Kit (Kit Part #: CR-11-126-02).
The board type MUST be a "Generic Relay" card reader board: - Reader Wiring harness (Part #: 02-06-39):
- 12V power supply (Part #: 03-01-46)
- High Voltage sensor (Part #: HV-SENSOR-01)
- Coin-drop block-out plates
- Wire Splicers
Installation Steps
Step 1: Turn Machine Power Off
Step 2: Remove coin-box
Removing the coin-box is only necessary for Card Only installs.
If you are installing the reader in a Hybrid Coin+Card configuration, the coin-box will still be needed.
Step 3: Number the reader using the DIP switch
Review our: Reader DIP Switch settings article for details on how to set the Card Reader's Machine Type, and Reader Number.
You need to do this BEFORE installing the Card Readers onto the machines, as accessing the back of the card reader is required.
Step 4: Start Signal Connector
Connect the reader's Start Signal connector to P2 on the machine's control board.
This connection is used by the reader to send the start pulse to the machine:
This connection is used by the reader to send the start pulse to the machine:
Note: For Hybrid Coin+Card Installations (Start Signal Wiring)
If you are installing our readers in a hybrid configuration, you will NOT be removing the coin-box or coin drop.
On Hybrid installs, the reader will need to be mounted elsewhere on the machine (drilling required)
On Hybrid installs, the reader will need to be mounted elsewhere on the machine (drilling required)
and both the coin drop, and card reader, will need to be connected to the machine's P2 header (Coin1/2 input).
The P2 connection on the machine has 4 PINs:
2 of these PINs are for Coin1's settings on the machine
2 of these PINs are for Coin2's settings on the machine:
You will need to connect the Coin Drop to Coin1's input PINs,
while the Card Reader's wires are connected to Coin2's input PINs.
You can use the Y-Cable that came with your card reader kit to make these connections:
Step 5: Busy sensing - High Voltage sensor
This reader MUST use a High Voltage Sensor device in order to receive a busy signal from the machine.
Do NOT connect the reader's door sensing wires directly to the machine without using a HV Sensor!
Do NOT connect the reader's door sensing wires directly to the machine without using a HV Sensor!
The High Voltage sensor is used to determine the running state of the machine.
Splice the two red wires across the Door Lock Solenoid
(it doesn't matter which wire gets connected to each side of the solenoid, just make sure 1 red wire is connected to either side of the solenoid).
(it doesn't matter which wire gets connected to each side of the solenoid, just make sure 1 red wire is connected to either side of the solenoid).
High Voltage sensor:
Door lock solenoid:
Reader Harness Connection:
Step 6: Power
Connect the 120/240Vac side of the power supply, either to an available wall outlet, or splice the power supply directly to the machine, using an appropriate high-voltage connection inside the machine.
When connecting to the machine directly, you'll be cutting off the AC prong, and splicing these wires directly to the machine (we recommend consulting the manufacturer, or an electrician, to confirm this type of connection).
Step 7: Mount the Reader
The mounting hardware you receive will different depending on if your machine has a Coin Box or not.
For Machine's with a Coin Box (Card Only Installs)
For Machine's with a Coin Box (Card Only Installs)
the Card Reader is typically mounted where the coin box has been removed, using the following mounting hardware:
A Coin Drop blockout plate will also be provided in these kits to cover the hole where the Coin Drop has been removed:
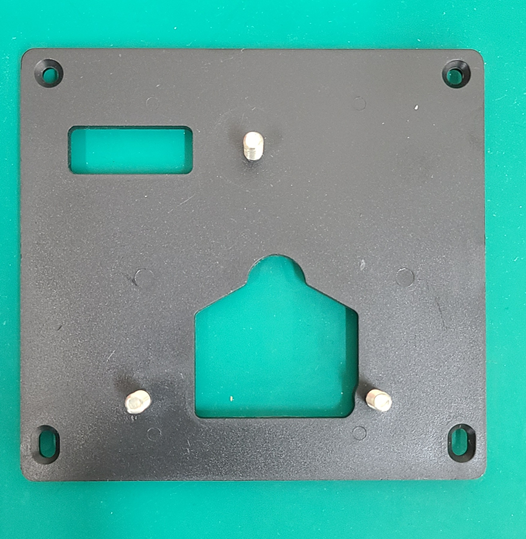
For Machine's without a Coin Box (Card Only Installs)
These will typically be the CardReady/EasyCard machines, and the reader mounting hardware will typically include a mounting backplate that looks like this:
These will typically be the CardReady/EasyCard machines, and the reader mounting hardware will typically include a mounting backplate that looks like this:
The Card Reader mounting backplate is designed to fit the holes that the EasyCard system was usualy initially:
For Hybrid Coin+Card Installations
You will need to find a spot on the machine to mount the reader that will allow you to pass the reader's wiring harness through to the inside of the machine (drilling custom holes will be required for this type of install).
You will receive the following mounting backplate as part of a Hybrid Washer reader kit:
You will receive the following mounting backplate as part of a Hybrid Washer reader kit:
You must use the Activation Card for this specific location (if a reader is activated with a different location's Activation Card, it will be unable to communicate with the VAC kiosk)
Step 9: Adjust the Coin Value Setting on the Machine
On these machines, our card reader is simply emulating a coin drop, and our reader only sends ONE pulse to trigger the machine to start.
By default, the Coin Value on the machine is usually set to $0.25 for coin drop operation;
so by default, each tap of a laundry card will only take $0.25 off the vend price being displayed on the machine (but the reader will charge the full price to the laundry card on each tap).
To allow the card reader to start the machine from 1 tap of the laundry card;
you'll need to change the Coin Value setting on the machine, from $0.25, to whatever the full vend price is on the machine.
Below is a link to a video on Dexter's website, that discusses how to change machine specific settings:
https://www.dexter.com/support/service-videos/k797crmrry/
https://www.dexter.com/support/service-videos/k797crmrry/
Setting Vend Prices
Set the Card Reader's vend price via the Laundro Portal.
See our Configuring Card Reader/Machine Vend Prices article for specific instructions on vend pricing.
The reader only sends ONE pulse to the machine.
Therefore, you will need to set the value of a single pulse to meet the vend price set on the machine itself.
Usually this means either setting the price of the machine to $0.25 so that it starts from 1 pulse.
OR changing the value of Coin1, on the machine itself, to match the full vend price of the machine.
See the Troubleshooting section if you're having trouble with this.
For A-series models, you can additionally enable the Super Cycle option.
The way it works is that after making payment for the base cycle, the customer has 30 seconds to present the card again to make additional payment for the Super Cycle option.
To enable this, first enable the Super Cycle on the washing machine itself. Then set the Supercycle cost (in the reader settings from the Portal) to a non-zero value which you want to charge for the Super Cycle.
Then set the Supercycle time (in the reader settings on the Portal) to approximately match the additional time the washer adds to the cycle when the Super Cycle is activated:
Troubleshooting
Below are problems commonly encountered during installation of readers on A-series Dexter machines. For more general reader troubleshooting, see Reader Support Process
| Issue | Explanation and resolution |
Reader taking money but machine doesn't start Reader may say also "Waiting to Start" | The reader will only sends ONE pulse to the machine, so ensure that the machine is configured to start off of one pulse. If the machine is only deducting 25cents from its displayed vend price, when a laundry card is used, then we know it is registering the pulse, but only as 25cents. Therefore, inside the MACHINE's configuration settings, you can either: 1) Change the value of one pulse to be equal to the vend price setting in the machine, or 2) Change the vend price of the machine cycle to $0.25 or $0.01. In either case, the one pulse from the reader would satisfy the machine's vend price and it should trigger the machine to start it's cycle. For Hybrid Coin+Card Installations, you'll need to leave Coin1's value as $0.25 so coin prices are not affected; but you'll need to change the value of Coin2 so that it equals the full vend price of this machine so that it will start from the 1 pulse it receives from the card reader |
Reader display showing "BUSY" but machine not running or Reader NOT displaying BUSY after washer started | This likely means that the High Voltage Sensor is not properly connect across the door lock solenoid. Review Step 5 of this article to confirm you have the HV Sensor connected correctly |
Reader does not allow for additional payment for run the Super Cycle Option | First ensure that the super cycle/extended wash cycle has been enabled on the machine itself. Confirm that you have the Coin1 Value (or Coin2 Value if this is a hybrid install) set to the exact vend price of the machine. Then check to make sure that once the machine is started, the reader's display changes. If the reader's display still says "waiting to start", after the machine has already started, then the reader is not receiving a busy signal from the machine, and therefore doesn't know when to prompt for the extra payment |
Related Articles
Dexter: C-series (washers and dryers)
This article covers installation of readers on Dexter C-series washers and dryers. The readers use Serial communication, and support advanced features like multi-vend pricing, full-cycle dryer pricing, Plus Cycle (e.g Prewash, Supercycle). Required ...Dexter X-Series (Touch control) - washers and dryers
This article covers installation of readers on Dexter X-series (Touch controls) washers and dryers. The readers use serial communication and supports advanced features like multi-vend pricing, full-cycle dryer pricing, status reporting an more. ...Dexter: N-series (WCN models)
This installation article covers WCN Dexter washers. Parts Reader (with Generic Relay board) Cable harness 12V power supply High voltage sensor (optional) Installation Before proceeding, you should assign numbers to each of the machines in the ...Wascomat: Gen5 and Gen6 washers
This installation note covers the old Gen5 and Gen6 washers. These are non-electronic, high voltage machines. The reader kit comes with a High Voltage Relay to control this timer. The reader is powered by a separate AC-DC power supply adapter ...Electrolux: Compass and Clarus Control Washers
This installation article covers Wascomat/Electrolux washers with Compass and Compass Pro controls (the ones with the knob) and the Clarus vibe controls. The reader uses Serial communication to communicate with the machine directly, including the ...