Electrolux: Compass and Clarus Control washers
This installation article covers Wascomat/Electrolux washers with Compass and Compass Pro controls (the ones with the knob) and the Clarus vibe controls The reader uses serial communication to control the machine, including vend pricing.
Parts
- Reader
- Backplate
- Cable harness
Installation
- Before proceeding, you should assign numbers to each of the machines in the laundry room/building. It is highly recommended that you place number labels on each washer and dryer machine.
- Set the machine type and number using the DIP switch on the reader circuit board:
See DIP switch settings page to understand how to configure DIP switch positions to set the machine type (washer or dryer) and number. Proceed with installing the reader on the corresponding machine type and number.
- Turn machine power OFF!
- Remove the coin drop if present
- Connect the cable harness to the RS-232 connector
 IMPORTANT: the orientation of the connector MUST be correct; and note that orientation is different between Compass and Compass Pro
First generation Compass:
Compass Pro and Clarus Vibe

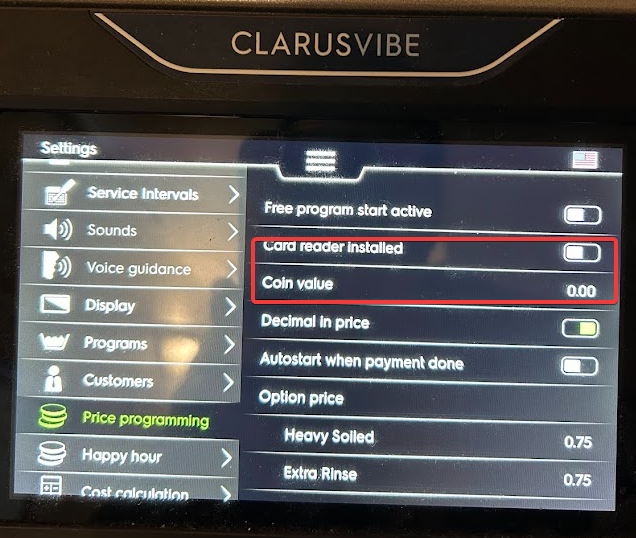
Caution. on Clarus Vibe touch screen washers, on current installations (March 2025 newer), unless you have been given specific instructions that the reader has been load with special firmware, you must have the Card Reader Installed disabled (ironically) and Coin Value at 0.00 in the washer settings menu:

6. Proceed to secure the reader to the machine using the nuts
7. Activate reader and set vend prices on the Portal:
Coin+Card (Hybrid)
If you're doing a Coin+Card setup on this machine, you need a secondary harness part 02-06-99, shown below.
This harness connects to the 4-pin connector on the side of the reader board
In this setup, the coin drop needs to be connected directly to the reader and not to the washer.
So disconnect the 3-wire Coin drop cable from the Washer and splice it to the other end of the cable harness, color for color, like this:
Setting Vend Prices
Troubleshooting
Below are problems commonly encountered during installation of readers on C-series Dexter machines. For more general reader troubleshooting, see Reader Support Process
| Issue | Explanation and resolution |
| Washer says "START NOT ALLOWED" when attempting to start the washer | The laundry card must be present or close to the reader when you press the START knob. |
Unable to change cycle after starting (regret) | Regret is a concept on compass control washers that allows customers to change a cycle shortly after starting the machine (e.g. go from Hot to Cold). This reader's firmware must be V4.193 or greater to allow cycle price changes after payment has been made. If you need this functionality, contact Laundroworks support and request a firmware update (older readers might not be remotely updatable) |
Related Articles
Electrolux: Compass Pro dryers
Electrolux Compass Pro Dryer This installation covers Electrolux Compass Pro Single and Stack Dryers. Parts Reader with a Generic Relay board inside For stack dryers, the readers have back-plates that differ between the left and right versions: For ...Wascomat/Electrolux Selecta II dryers
This article covers installation of readers on Wascomat or Electrolux dryers with Selecta II controls. The readers for these machines use PULSE control (Coin Drop emulation). Required parts Card Reader Kit (model CR-11-130-04 for stacks, CR-11-230-04 ...Gen4 washers
This installation note covers the old Gen4 washers, such as W184. These washers use mechanical timers. The reader kit comes with a High Voltage Relay to control this timer. The reader is powered by a separate AC-DC power supply adapter (provided with ...Milnor Washers
This article covers reader installation on Milnor washers. These readers uses Pulse control (Coin Drop Emulation) to start the machine. Parts Card Reader (with Generic Relay reader board - Part #: ASSY-02-02-11) Reader wiring harness (Part #: ...Dexter X-Series (Touch control) - washers and dryers
This article covers installation of readers on Dexter X-series (Touch controls) washers and dryers. The readers use serial communication and supports advanced features like multi-vend pricing, full-cycle dryer pricing, status reporting an more. ...